Configuring Norton ConnectSafe on the TP-Link Archer C7
Preparing to flash custom firmware
You will need a computer to connect to the router via WiFi1.
First, determine which version router you have. C7 comes in four versions to date2, and on the bottom of your router, you will see a version number after the model: Archer C7(US) Ver: ?. If you don't see a version listed, that means you have version 1. Once you know the version of your Archer C7, download the latest DD-WRT firmware for the Archer C7. Go to this page and click on the folder of the current year. Then choose the folder with the most recent date. When you open it, the list of supported devices is huge, so it is best to search on the page for “Archer”, at which point you will see tplink_archer-c7 versions 1, 2, 3, and 4. Open that folder and you will need two files (assuming your router is from the US):
-
factory-to-ddwrt-US.bin
-
tplink_archer-c7-v?-US.bin
Both files are needed because the factory file has to be flashed first to bypass the protection on your router, allowing you to flash the second file with the full firmware package.
Download these and store them in your downloads folder.
Opening the box
Your TP-Link Archer C7 router comes with an Ethernet cable, a power supply, and three antennaes in the box. Attach the tree antennaes by screwing them on to the back of the router. Then plug the router into the wall with its included power supply. In a moment, you will see a new wireless signal on your laptop or tablet: TP-Link_xxxx. You are now ready to flash the firmware.
Flashing the base dd-wrt firmware
Connect your device to the TP-Link wireless signal. It will ask for a password which you will find on the bottom of the router. Type that in and wait for it to connect. It will take some time to connect because your computer is really looking for the Internet on the other end. It will finally give up and say you are connected, but that the connection is limited with no Internet.
Now, open a web browser and type in the following address: 192.168.0.1
Immediately, you should see a login screen:

Log in with username: admin and password: admin. On a sidenote, you'll be amazed at how many people leave this as their default password on their home networks. You, of course, won't be among them!
Flashing the base firmware
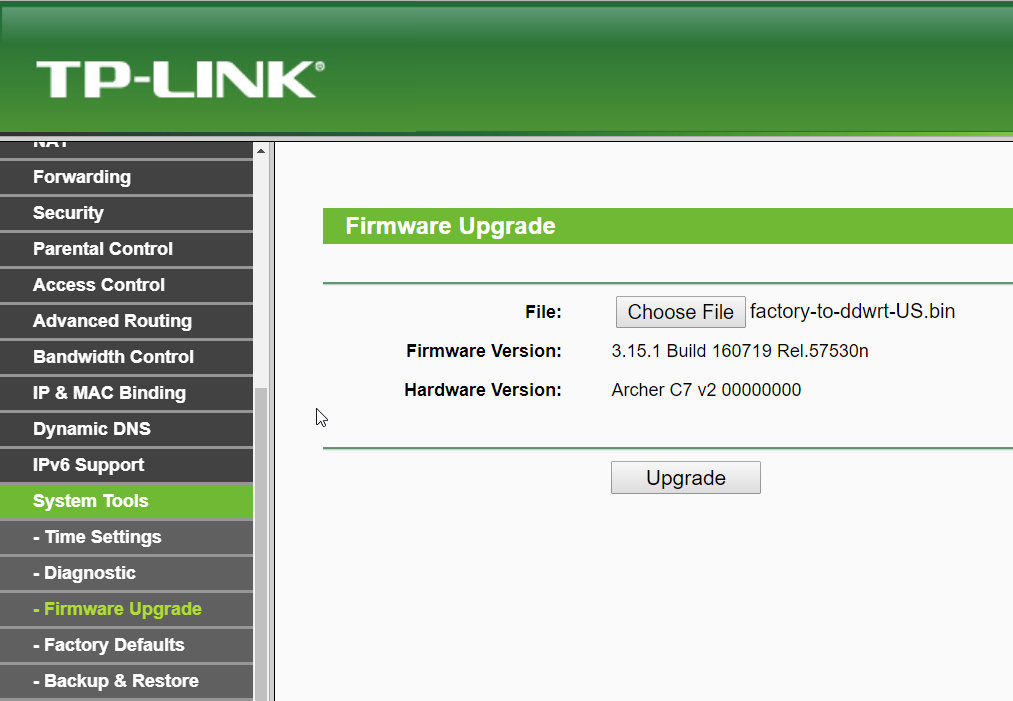
On the left menu, choose System Tools and then Firmware Upgrade
Press the button to choose file and select the first file factory-to-ddwrt-US.bin file. Now click the Upgrade button.

The file will upload to the router, and then after about a minute, the router will reboot. When it reboots, its WiFi signal goes away. Note that your computer will probably connect to some other WiFi network at this point. In the following steps, you must always make sure that you connect back to the signal from your router before you attempt to access the configuration panel.
When the router boots back up you should see a new WiFi signal-- dd-wrt as an open network.
Flashing the final dd-wrt firmware
Connect to the dd-wrt wireless signal, no password is needed.
Go back to the browser again, but this time the IP address is different. Type in 192.168.1.1
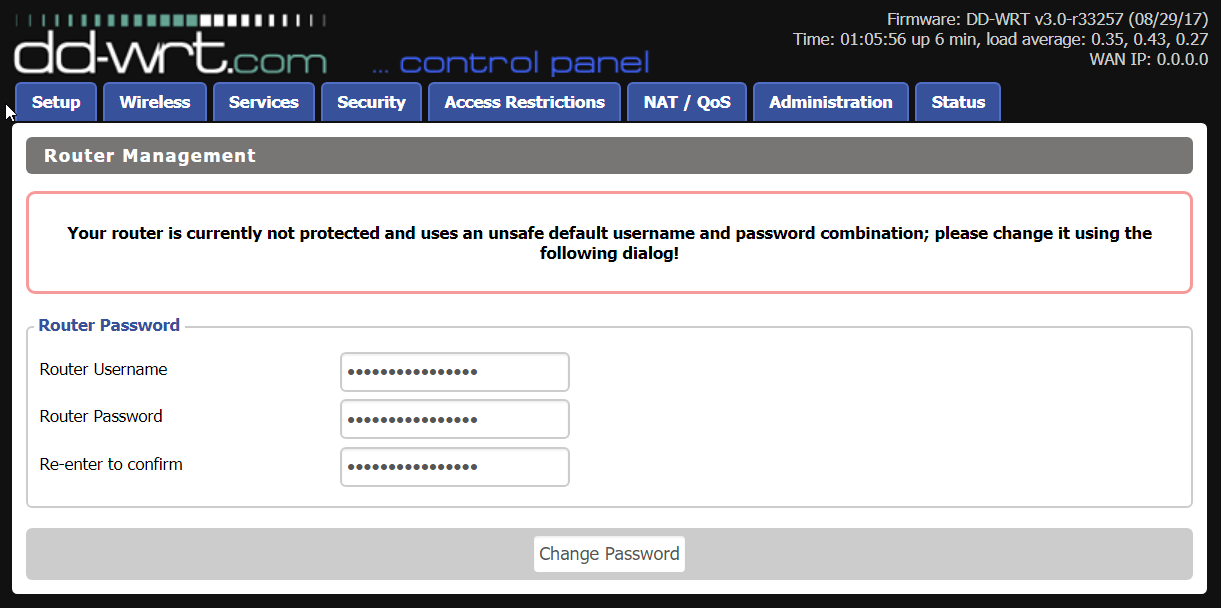
You will see a new login panel asking you to set the default password. Since you want this system to be secure, set username to admin and select a password that you will remember. Store it somewhere that you won’t forget because you will need to log in when you want to change the configuration settings.

We are ready to flash the final firmware, this time using the second file: tplink_archer-c7-v2-US.bin. To do so, go to the Administration tab, then select Firmware upgrade from the row of tabs.
Select the file above for your model (not the one that says factory) and select Upgrade
Your router will install the firmware and then reboot. Once again, when it reboots, you will lose its WiFi signal. Watch the list of WiFi signals until you see dd-wrt appear again. This may take several minutes. Then connect to it. If your connection fails, wait a minute and try again.
Configuring the router
When successfully connected to dd-wrt, go back in your browser to:
192.168.1.1
You should see the basic settings screen below. If you are first asked to log in, use the username and password that you specified before. (If it says you are not protected with a password, you may have to enter it again)
After this point, If things don't work as explained in the rest of this article, you can try the factory reset procedure explained in this footnote3. We can skip that unless you have problems.
If you the password you selected got reset, you will see the set password screen once again. You’ve already got one picked out, so put it in again with username admin if it asks and proceed.
Next, click on the Setup tab to start configuring your network.

You should see the default page for the router with the word “DD-WRT” as the router name at the top.
Click on Setup and then Basic Setup.
Set your Router Name to "ConnectSafe", then Save at the bottom of the page.
Go further down to Network Setup
Your Local IP address is 192.168.1.1 Only change this if you know what you are doing. Set the Local DNS to match the Local IP address.
If you know the IP address of your modem, the address you use to access your modem's configuration, put it in the Gateway field. Otherwise leave it alone.
Setting the DNS Servers
Set Static DNS settings and the following options to match this screen:

This is for the middle level protection suitable for a whole household as explained on the SafeConnect website. For a different level of protection (there are only 3 levels), go to their website.
Click Save at the bottom of the page
Click on the Wireless tab and the Basic Settings tab. Configure the WiFi as follows. You might have your own preferences about the network mode or channel, so the most important fields to set are highlighted.

Instead of MyHome, set it to The Chesterton’s or whatever. Do this here in the 2.4 GHz section and also in the 5GHz section below. We recommend giving the same name to both networks4.
Click on the Save button on the bottom and go to the Wireless Security tab.
Here, I highly recommend the settings in the yellow box. You would have to have an extremely old device for these not to work.
The WPA Shared Key is the WiFi password that you will give out to everyone who wants to connect to your WiFi. Make it a phrase. One suggestion would be "Living in the light". Make it short phrase you want to share with your friends and family.

When all this is done, you are ready to apply the settings:
Click the Apply button at the bottom of the page and wait a moment. The router should reboot automatically, but if it doesn't seem too, you can turn it off and back on again after waiting a few seconds.
Your router should be ready to start working for your household.
How to install your router
- 1. An ethernet port is usually recommended for installing firmware. We have done this successfully over WiFi, so we won't explain the process with a direct ethernet connection here.
- 2. There is no 5.0 at the time of this article, but if there is, do not flash the wrong version firmware if you do not find it at the link below.
- 3. It was recommended by some to do this after the final flash to make sure the firmware has been completely applied. However, it was not necessary for the six units that I flashed. To make absolutely sure that there are no traces of the old firmware in the router, you can do a factory reset. It takes 90 seconds and a bit of dexterity, but you will have peace of mind that your firmware upgrade has been done well and will remain permanent.
- Press and hold the WPS/reset button in the back of the router for 90 seconds.
- After the first 30 seconds, unplug the power cord while keeping the button pressed.
- After 60 seconds, plug the power cord back in while continuing to hold the reset button.
- After 90 seconds you are done. Turn the router off with the switch in the back and then back on.
- 4. This allows each device to connect to the loudest and most preferred signal automatically.
